Best BBQ Recipes From Grilling Experts
Best BBQ Recipes From Grilling Experts – There aren’t many things more American than barbecue, and patience, tenacity and love are at the center of being a top BBQ Pitmaster.
Best BBQ Recipes From Grilling Experts – It is a craft unlike any other and those that have honed their skills to reach the top of the game stand out above the rest.
Best BBQ Recipes From Grilling Experts – A handful of people have shaped American barbecue into what it is today.
Best BBQ Recipes From Grilling Experts – They’ve elevated our primordial instinct into something amazing, and they’re in a class of their own.
Best BBQ Recipes From Grilling Experts – Here are some of the most influential pitmasters and BBQ personalities in the country.
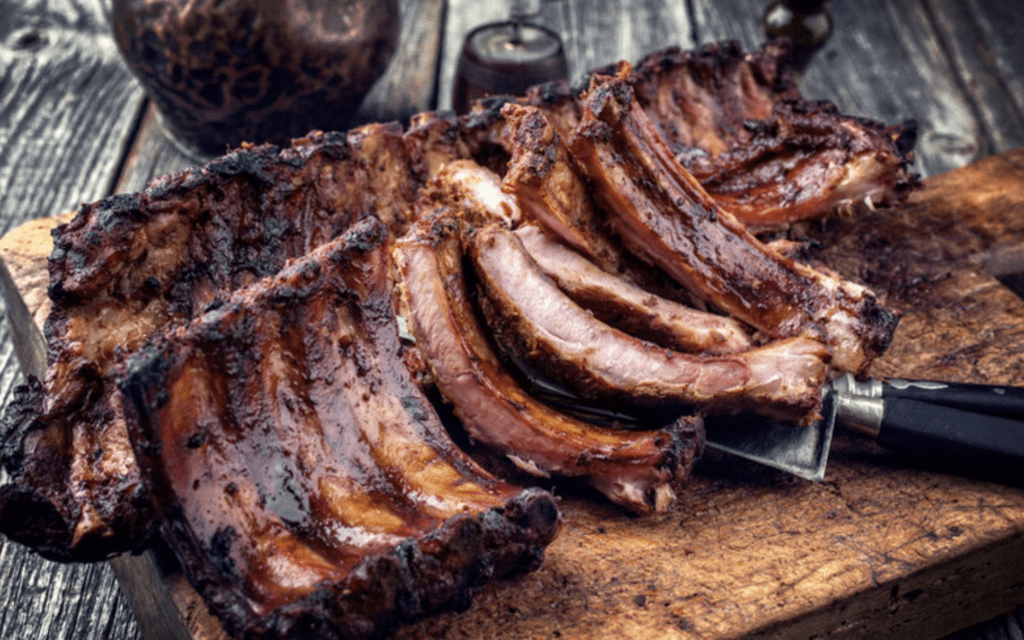
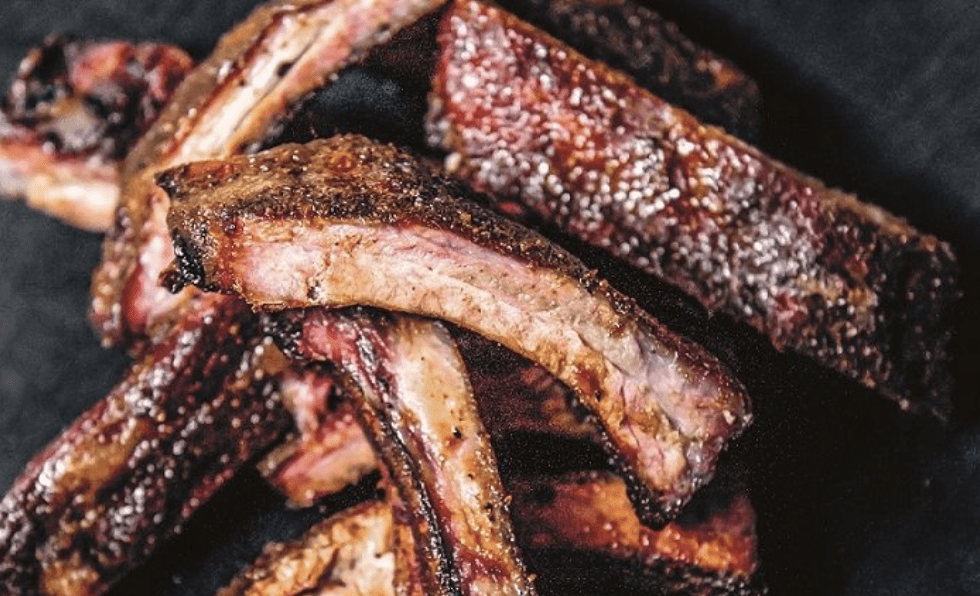
Johnny Trigg Method For Smoking Pecan & Cherry Pork Spareribs
3-2-1 Ribs – Preparation
Here’s how to use the 3-2-1 method.
This is leaving your ribs on the smoker naked for three hours, foiled for an additional two hours then naked for one more hour.
This is the way Johnny Trigg cooks his ribs.
This way ensures your ribs are of the highest quality.
Begin by thoroughly washing your ribs.
Trim off the excess fat from the back and front of your ribs.
Use your dry rub to sprinkle the side of your ribs with the meat.
Press the rub into the meat.
Sprinkle with garlic powder and let sit at room temperature for approximately 45 minutes.
Johnny Trigg recommends against using briquettes because they contain fillers.
Preference is to use wood logs, chunks or chips instead.
Do not soak your wood or you will end up with too much smoke flavor.
Preheat your smoker to 250 degrees.
Maintain the temperature between 225 and 275 degrees.
Smoke your ribs for three hours.
Mist your ribs with apple juice every hour.
After three hours, take your ribs off the smoker.
The Preparation of the Aluminum Foil
USe heavy-duty aluminum foil due to the weight of the ribs.
Cut a piece of your foil big enough for completely wrapping your ribs.
Spread your margarine over the foil covering an area the same size as your rib rack.
Johnny Trigg recommends using a wave pattern.
Place your cherries and pecans on top of the butter.
Sprinkle with hot-pepper sauce and a handful of brown sugar over the margarine.
Now add strips of Tiger sauce and honey.
Make sure your strips cover everything evenly.
Sprinkle with salt, black pepper, paprika, onion flakes and red pepper to your taste.
Use your fingers to stir up your ingredients a little.
Place your rack with the meat side down on top of the aluminum foil mixture and add 1/4 cup of apple juice.
Wrap the foil around your rack, making certain the foil is well sealed and tightly closed.
Repeat the same step for your second rack of pork ribs.
Johnny Trigg’s rib wrap is amazing.
The ingenuity of this wrap is one of the reasons he won so many competitions.
If you are using a larger rack of ribs, you will need to use more of the ingredients to cover your meat thoroughly.
You must make certain the area of the foil you have covered is big enough for your entire rack.
Once you have sealed the foil, place your ribs back onto your smoker for another two hours.
All of the ingredients you placed in the foil will cook together to form an incredible glaze on your ribs for flavor the Trigg way.
Best BBQ Recipes From Grilling Experts – The Last Stage of Smoking
After two hours, remove your ribs from the smoker.
Take off the aluminum foil carefully because it is extremely hot.
This is a great time to use your favorite barbeque sauce on both the front and back of the ribs.
Wait two hours, then remove your ribs from the smoker. Carefully remove the aluminum foil.
Johnny Trigg glazes his ribs using a special mixture.
Places the ribs front side up, then uses corn syrup, molasses and tomato sauce to glaze his ribs. We recommend doing the same.
Place your ribs back on your smoker naked for one more hour.
For a more complete meal, grab a pie tin.
Fill the tin with beans and add some of your favorite barbeque sauce.
Now place the tin in your smoker.
You will need to stir your beans about every fifteen minutes.
Do not make the mistake of overcooking your ribs.
Use a temperature gauge so you will be certain when they are done.
After approximately one hour, your masterpiece should be cooked all the way through.
In addition to the gauge, a good way to know your racks are done is when you lift the ribs a little pick them up and the meat begins to tear.
Remove your meat from the smoker and use more barbeque sauce immediately.
Johnny Trigg uses an electric carving knife.
Cut between the bones so you will have individual ribs.
Place your ribs onto a platter and serve with your beans.
You should be able to feed three to four people.
The Specific Steps
Begin by thoroughly washing your ribs.
Trim off the excess fat from the back and front of your ribs.
Use your dry rub to sprinkle the side of your ribs with the meat.
Sprinkle with garlic powder and let sit at room temperature for approximately 45 minutes.
Johnny Trigg recommends against using briquettes because they contain fillers.
Johnny recommends using wood logs, chunks or chips instead.
Do not soak your wood or you will end up with too much smoke flavor.
Preheat your smoker to 250 degrees.
Maintain the temperature between 225 and 275 degrees.
Smoke your ribs for three hours.Mist your ribs with apple juice every hour.
After three hours, take your ribs off the smoker.
It’s recommend to use heavy-duty aluminum foil due to the weight of the ribs.
Spread your margarine over the foil covering an area the same size as your rib rack.
Place your cherries and pecans on top of the butter.
Sprinkle with hot-pepper sauce and a handful of brown sugar over the margarine.
Now add strips of Tiger sauce and honey.
Make sure your strips cover everything evenly.
Sprinkle with salt, black pepper, paprika, onion flakes and red pepper to your taste.
Use your fingers to stir up your ingredients a little.
Place your rack with the meat side down on top of the aluminum foil mixture and add 1/4 cup of apple juice.
Wrap the foil around your rack, making certain the foil is well sealed and tightly closed.
Repeat the same step for your second rack of pork ribs.
Once you have sealed the foil, place your ribs back onto your smoker for another two hours.
After two hours, remove your ribs from the smoker.
Take off the aluminum foil carefully because it is extremely hot.
This is a great time to use your favorite barbeque sauce on both the front and back of the ribs.
Wait two hours, then remove your ribs from the smoker.
Carefully remove the aluminum foil.
Place your ribs back on your smoker naked for one more hour.
For a more complete meal, grab a pie tin.
Fill the tin with beans and add some of your favorite barbeque sauce.
Now place the tin in your smoker.
You will need to stir your beans about every fifteen minutes.
Do not make the mistake of overcooking your ribs.
We recommend using a temperature gauge so you will be certain when they are done.
After approximately one hour, your masterpiece should be cooked all the way through.
In addition to the gauge, a good way to know your racks are done is when you lift the ribs a little pick them up and the meat begins to tear.
Remove your meat from the smoker and use more barbeque sauce immediately.
Cut between the bones so you will have individual ribs.
Place your ribs onto a platter and serve with your beans.
You should be able to feed three to four people.
Johnny Trigg Ribs Recipe – Ingredients
Prior to selecting your ingredients, remember Johnny Trigg always uses the highest quality ingredients available, especially for the meat.
Throw away your old spices every six months and replacing them.
Fresh spices are one of your keys to success.
Johnny Trigg Method For Smoking Pecan & Cherry Pork Spareribs Ingredients
Two racks of fresh pork spareribs (five to six pounds)
1/4 to 1/2 cup brown sugar (firmly packed)
One cup of your favorite dry rub
1/4 to 1/2 cup softened butter or squeezable margarine
1/4 to 1/2 cup of honey
Three ounces of Tiger Sauce ( 3/4 of a five-ounce bottle)
Your favorite barbeque sauce ( one and 1/2 cups)
Apple juice
Garlic powder
Salt
Sugar
Paprika
Onion flakes
Red pepper
Black pepper
Corn syrup
Molasses
Tomato sauce
One teaspoon hot-pepper sauce (Use according to your taste)
Pecans
Cherries
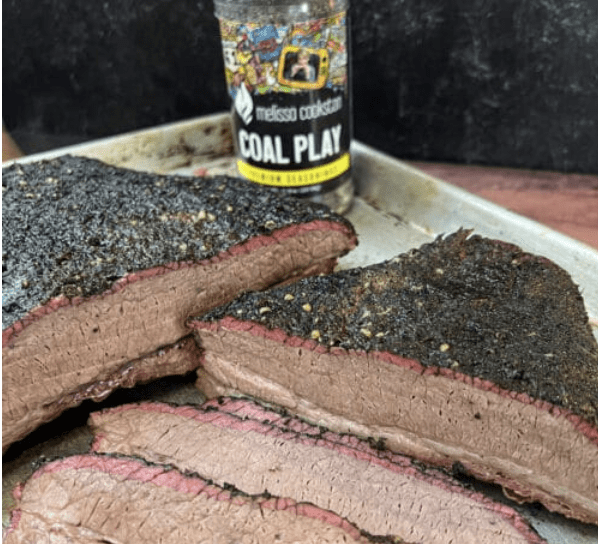
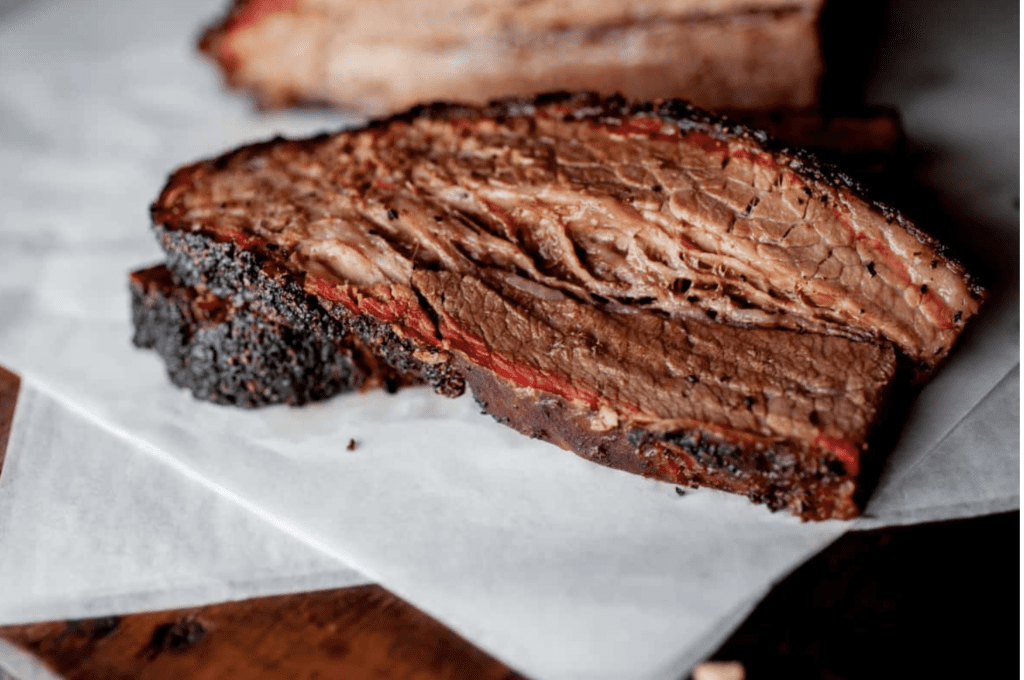
Melissa Cookston Backyard Smoked Brisket Flat
Packer Briskets vs Flats
A whole brisket is comprised of 2 main muscles, which are most commonly termed the “flat” and the “point.”
They are separated by a layer of fat, and can easily be separated.
The point is commonly used to make brisket burnt ends, corned beef, and pastrami.
You will almost never find raw brisket points for sale, as they are swallowed up by large meat manufacturers for corned beef and pastrami usually.
Brisket flats are available in most meat markets, warehouse clubs, and even grocery stores, but sometimes the price for the flat is close to the same as if you bought a whole brisket.
With that being said, if you find a sale on a flat, buy that. If you don’t, buy a whole packer brisket and trim out the pieces (as most competitors do.)
If you want to cook both pieces, you can follow this same recipe, or turn the point into brisket burnt ends.
The first thing to determine is what smoker/grill you are cooking on.
They all will cook differently, even given the same temperature.
So, look at this recipe as a method, not an absolute.
Secondly, I specify cooking at 275 degrees in this recipe for 5 hours, then rested for an hour.
Depending on your smoker, you may need more or less time.
For this, I was using a Traeger Timberline with a smoke tube for extra flavor.
The hotter you cook, the higher internal temperature you may need to get to.
There is no “brisket is done at xxx degrees.”A good rule of thumb is to start checking for tenderness when the brisket achieves 200 degrees.
For this brisket, I didnt’t pull it off the grill until it reached 208 degrees.
Test for tenderness by inserting the probe of your thermometer. When it’s “like butter” the brisket is done.
Prepare a smoker to run at 275 degrees, with your favorite wood flavor.
Pull brisket out of the refrigerator, lightly rinse and pat dry. Using a filet knife, trim off fat and silverskin from the meat side of the brisket.
Trim any large fat deposits.
Season meat side heavily with seasoning, then allow to sit out, lightly covered, for 30 minutes before placing on smoker.
Place on smoker meat side up.
Allow to cook until brisket temperature reaches 150 degrees.
Remove brisket and wrap in heavy-duty foil, pour in beef stock, then seal foil.
Cook until it reaches 200 degrees, then start checking for tenderness.
When a probe can be inserted in the meat and the meat has little resistance, pull the brisket from the smoker.
Carefully pour out juices, then rest brisket in a small cooler covered in a towel for an hour.
Pour the juices into a fat separator and allow to sit out to allow the fat to separate.
After the brisket has rested, slice against the grain in 1//4″ slices.
Pour juices over brisket and serve.
Melissa Cookston Backyard Smoked Brisket Flat Ingredients
1 8-10 lb beef brisket flat
2–3 TBS Coal Play Beef Rub, or your favorite brisket rub
2/3 cup beef stock
Tootsie Tomanetz Style Texas Pork Steaks
Cut the pork neck into steaks approx. 6-8 cm thick.
Mix together the ingredients for the Texas Dry Rub and rub generously into the meat.
Marinate in the fridge for a few hours.
Prepare the grill for direct heat well away from the embers.
Regulate to approx. 130-135°C and place some smoking wood on the embers to taste.
Now place the meat on the grid and close the grill, keeping the temperature roughly in the desired range.
Don’t panic, due to the great distance to the embers and because dripping fat can hardly burn openly due to a lack of oxygen, the steaks will not burn from below.
Now prepare the mop sauce:
Bring the water to a boil, then add the onion and cook for about 30 minutes.
Add the butter, then stir in the apple cider vinegar, Worcestershire sauce, mustard powder, and brown sugar.
Mix gently with a hand blender until the onions are chopped into small pieces.
Keep the mop sauce lukewarm and, after 2 hours, sprinkle the meat with the mop or brush once every hour .
After about 5 to 6 hours (or when the core temperature is about 70 °C), turn the steaks over, drizzle over the mop sauce again and continue cooking for about 2-3 hours until they are very tender.
As is usually the case with the low & slow BBQ, I don’t go directly to the core temperature, but pierce the steaks with a skewer or thermometer.
I then pay attention to the resistance, if it is very easy, the meat is tender. The KT will usually be around 80 to 90°C.
Now get the pork steaks off the grill and serve with BBQ sauce, cole slaw, BBQ beans and cornbread, for example.
They are also great for a sandwich.
Leftovers can be frozen wonderfully and processed in a variety of ways, e.g. for BBQ pizza, tacos, sandwiches, casseroles, tortilla chips and more.
Tootsie Tomanetz Style Texas Pork Steaks Ingredients
Pork neck as needed for the number of steaks
2.1 oz of coarse sea salt
1.4 oz of black pepper, coarsely ground or ground
.35 oz of garlic granules
.35 oz of onion granules
.18 grams of chilli flakes
Tootsie Style Mop Sauce:
1 liter of water
1 onion, in rings
1.8 oz of butter
2 oz apple cider vinegar
1 oz Worcestershire sauce
.53 oz of mustard powder
.53 oz of cane sugar
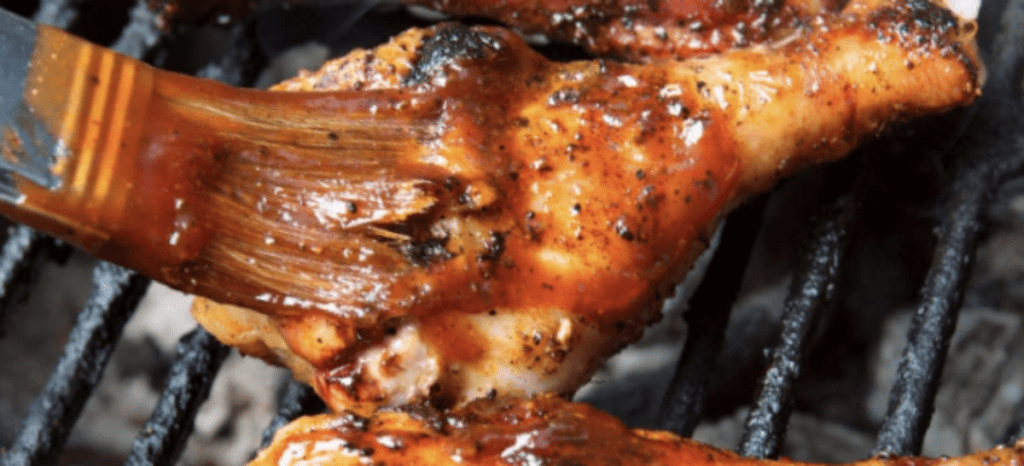
Mike Mills Apple City BBQ Grilled Chicken
Wash the chicken and brush with vegetable oil.
Sprinkle it liberally with garlic salt and Magic Dust.
Cook over indirect medium heat for 20 to 30 minutes or until an internal temperature of 180 degrees.
Halfway through the cooking process, baste the chicken with a little oil and sprinkle with more Magic Dust.
After you take the chicken off the grill, immediately mop it with Apple City Barbecue Sauce.
Serves 2 to 4
Mike Mills Apple City BBQ Grilled Chicken Ingredients
1 whole chicken, cut in half, or chicken pieces as desired
Garlic salt
Magic Dust
1/2 cup vegetable oil
1 cup ketchup
2/3 cup seasoned rice vinegar
1/2 cup apple juice or cider
1/4 cup apple cider vinegar
1/2 cup packed brown sugar
1/4 cup soy sauce or Worcestershire sauce
2 teaspoons prepared yellow mustard
3/4 teaspoon garlic powder
1/4 teaspoon ground white pepper
1/4 teaspoon cayenne
1/3 cup bacon bits, ground in a spice grinder
1/3 cup peeled and grated apple
1/3 cup grated onion
2 teaspoons grated green bell pepper
Apple City Barbecue Sauce
This award-winning sauce enhances just about any barbecue.
Some barbecue sauce is very thick and just sits on top of the meat.
This sauce is smooth and on the thin side, and it seeps down into the meat.
Combine the ketchup, rice vinegar, apple juice or cider, cider vinegar, brown sugar, soy sauce or Worcestershire sauce, mustard, garlic powder, white pepper, cayenne, and bacon bits in a large saucepan.
Bring to a boil over medium-high heat.
Stir in the apple, onion, and bell pepper.
Reduce the heat and simmer, uncovered, 10 to 15 minutes or until it thickens slightly.
Stir it often.
Allow to cool, then pour into sterilized glass bottles.
A glass jar that used to contain mayonnaise or juice works real well.
Refrigerate for up to 2 weeks.
To make this sauce a little hotter, add more cayenne pepper to taste, approximately another 1/4 to 1/2 teaspoon.
Be careful; a little cayenne goes a long way.
Tips: Oil the meat, not the grill Sprinkling with garlic salt adds extra flavor and helps the skin crisp up Magic Dust adds great flavor.
Use chicken with bones to help cook the inside faster and better.
Cook the meat bone-side down.
Don’t cook over direct heat—the inside will be raw and the outside will be burned.
Don’t turn the meat and don’t poke the meat with a fork.
Use a little apple wood along with charcoal for extra flavor.
Don’t sauce the meat until right before you take it off the grill.
The sugar in the sauce will burn.
Magic Dust
ground 1/4 cup sugar
2 tablespoons mustard powder
1/4 cup chili powder
1/4 cup ground cumin
2 tablespoons ground black pepper
1/4 cup granulated garlic
2 tablespoons cayenne
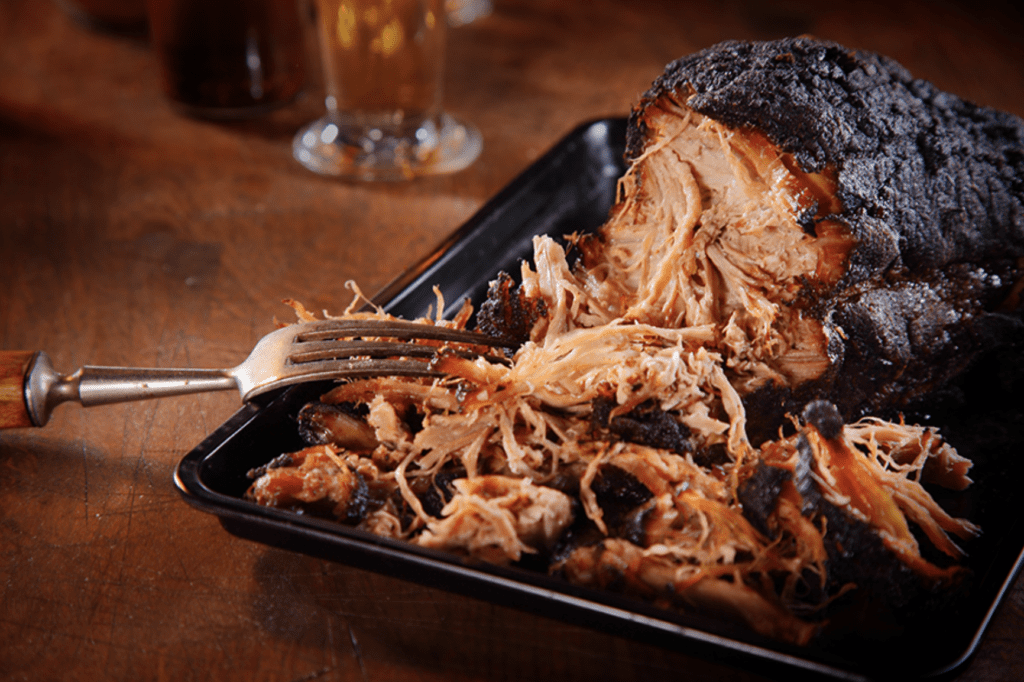
Chris Lilly’s Six-Time World Championship Pork Shoulder
Championship Pork Shoulder – Pre Cook
Mix all injection ingredients together and then Inject pork shoulder evenly with injection solution.
Apply a generous amount of rub onto meat.
Pat so the rub will adhere.
Championship Pork Shoulder – The Cook
Place in a smoker and cook with indirect heat for 16 hours on 225°F.
Serve with sauce on the side or paint shoulder with sauce the last 20 minutes of cooking.
When done, the pork should pull off the bones easily.
The internal temperature of the pork should reach at least 195°F.
Chris Lilly’s Six-Time World Championship Pork Shoulder Rub
1/4 cup Dark Brown Sugar
1/2 cup Sugar
1/2 cup Paprika
1/3 cup Garlic Salt
1/3 cup Sea or Kosher Salt
1 tbsp Chili Powder
1 tsp Oregano Leaves
1 tsp Cayenne Pepper
1 tsp Ground Cumin
1 tsp Black Pepper
Pork Injection
3/4 cup Apple Juice
1/2 cup Water
1/2 cup Sugar
1/4 cup Salt
2 tbsp Worcestershire Sauce
The Rest of the Ingredients
1 Whole Pork Shoulder (approx. 16 pounds)
1 Bottle Big Bob Gibson Championship Red Sauce (or substitute your favorite BBQ sauce)
Mike Mills Legendary Baby Back Ribs
Our royalty status on the competition circuit originated with our long-reigning champion baby back ribs.
Also known as loin backs, baby backs are cut “high on the hog” and come from the curved region of the rib cage.
You’ll notice the bones have a slight arch to them, and the meat has a bit of pork chop or pork loin flavor.
When buying your baby backs, pay attention to the size of the ribs.
Smaller 2-pound racks come off a younger hog and are more tender, with a higher meat-to-bone ratio.
The other secret to delicious ribs—of any cut—is cooking them long enough.
Because there’s not enough meat on a rib to easily use a thermometer, rib doneness is best checked by hand: Lift up the rack, using one finger, from one end; it should bend like a swayback horse.
If it doesn’t bend much or has any tension at all, it needs to go back on the cooker.
If you cut the rack in half or thirds, you’ll be able to pick up the pieces individually and bend them in order to judge doneness.
They should bend easily, but not break in half. When you’ve cooked enough racks, you’ll be an expert judge of perfect doneness.
Meantime, be patient.
Experiment with different combinations of rubs and sauces, from savory to sweet, to give the ribs a whole different flavor.
Mike Mills Legendary Baby Back Ribs – Prep the Meat
To remove the thin, papery membrane from the inner side of the ribs, lay each rack, bone side up, on a flat surface and slide the handle of a teaspoon between the membrane and the meat, working from one end all the way to the other.
Use a paper towel to grab ahold of the membrane and pull firmly to peel the whole thing off.
Then use the bowl end of the spoon to scrape away any extraneous fat on the bone side of the rack, between the bones.
Don’t scrape all the way down to the bone; just remove any thick deposits. Turn the rack over and inspect the front.
Use a sharp knife to trim off any scraggly edges and hard pieces of fat (which won’t render out during the cooking process).
Cut the racks in halves or thirds as needed to fit on the cooker.
Lightly sprinkle each side with dry rub.
You’ll be layering on rub several times during the cooking process, so don’t overdo it now.
Set the ribs on a baking sheet, cover them with plastic wrap, and refrigerate until you’re ready to put them on the cooker.
Note: You can dust the ribs with dry rub up to 4 hours prior to cooking, but if they sit much longer than that, the salt in the rub will begin to pull moisture from the meat.
Set up the cooker for indirect-heat smoking: Open the top and bottom vents.
Pile 3 pounds of the charcoal in one half of the cooker, leaving the other half empty.
Load a charcoal chimney one-quarter full of charcoal and light it.
When the coals in the chimney are glowing, dump them on top of the pile of charcoal in the cooker.
Set the wood on top of the coals, replace the grate, and put the ribs over the side with no coals (the indirect cooking area), bone side down.
Close the lid.
Don’t open the cooker for 1 hour, but keep a close eye on the temperature when it reaches 185°, which might happen very quickly, close the vents about halfway so that less air comes in to feed the fire and the heat in the cooker rises slowly.
Let the temperature climb to between 225° and 250°.
Maintain your target temperature for the duration of the cook.
Throughout the entirety of the cook, be on the lookout for fluctuations in cooker temperature; if it dips more than 5° below your target and opening the vents isn’t sufficient to bring it back up, you will need to add a few hot coals.
If at any point the temperature climbs above your target by more than 5°, close the top and bottom vents further so that even less air comes in to feed the fire.
After 1 hour, open the lid and check the edges of the ribs closest to the fire. If they look like they’re beginning to brown, rotate the racks, moving the pieces that are farthest away and placing them closest to the fire, and vice versa. (Do not flip the ribs over, now or at any other point during the cook.)
Close the lid and continue cooking the ribs for another 2 to 4 hours, monitoring the cooker temperature and checking every 20 minutes or so to see if the surface of the meat looks dry or moist. If the ribs look dry, mist them with some apple juice and sprinkle on another light coat of dry rub.
Ribs “sweat” about three times during the smoking process, indicating that the seasoning from the dry rub and the flavor from the smoke are being absorbed into the meat.
Never flip the ribs over; instead continue rotating them so each piece cooks evenly.
Prepare another round of charcoal in the chimney as needed.
This cook should not require more charcoal than the initial amount, but we always keep some coals at the ready just in case more are needed to maintain the temperature.
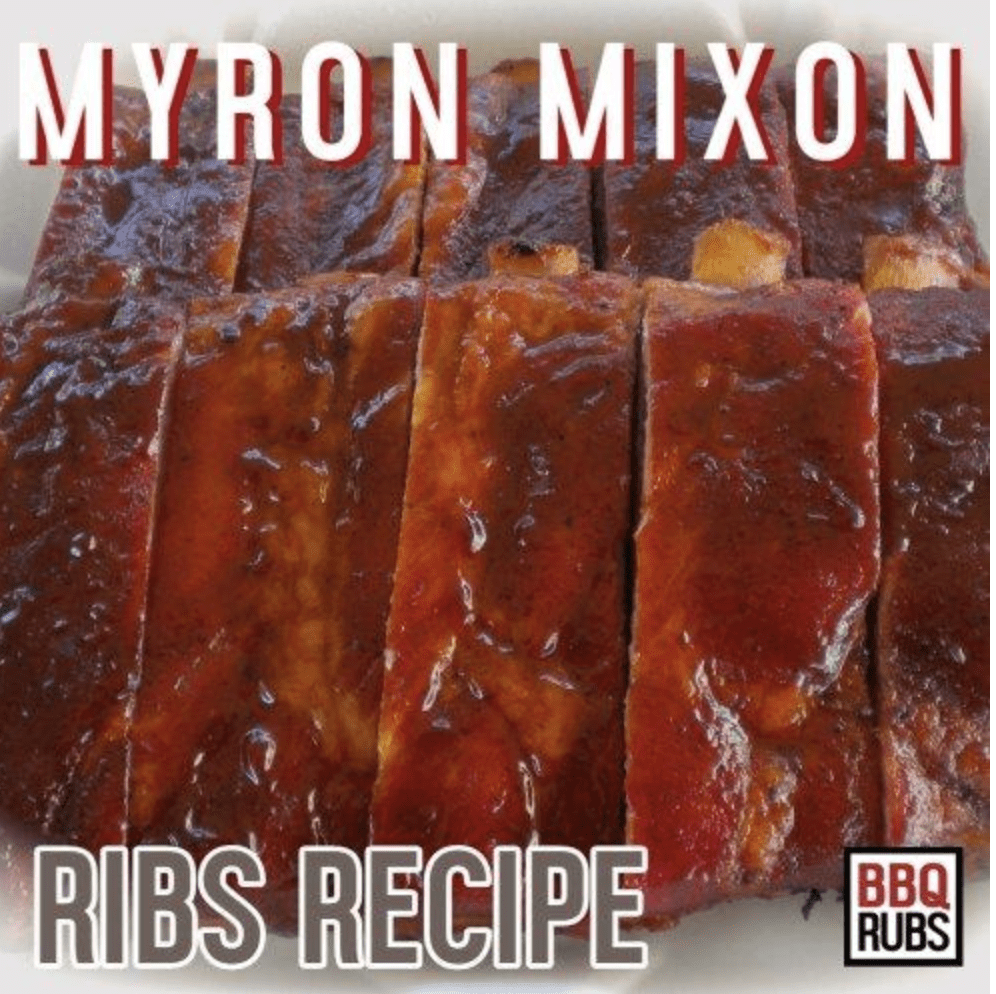
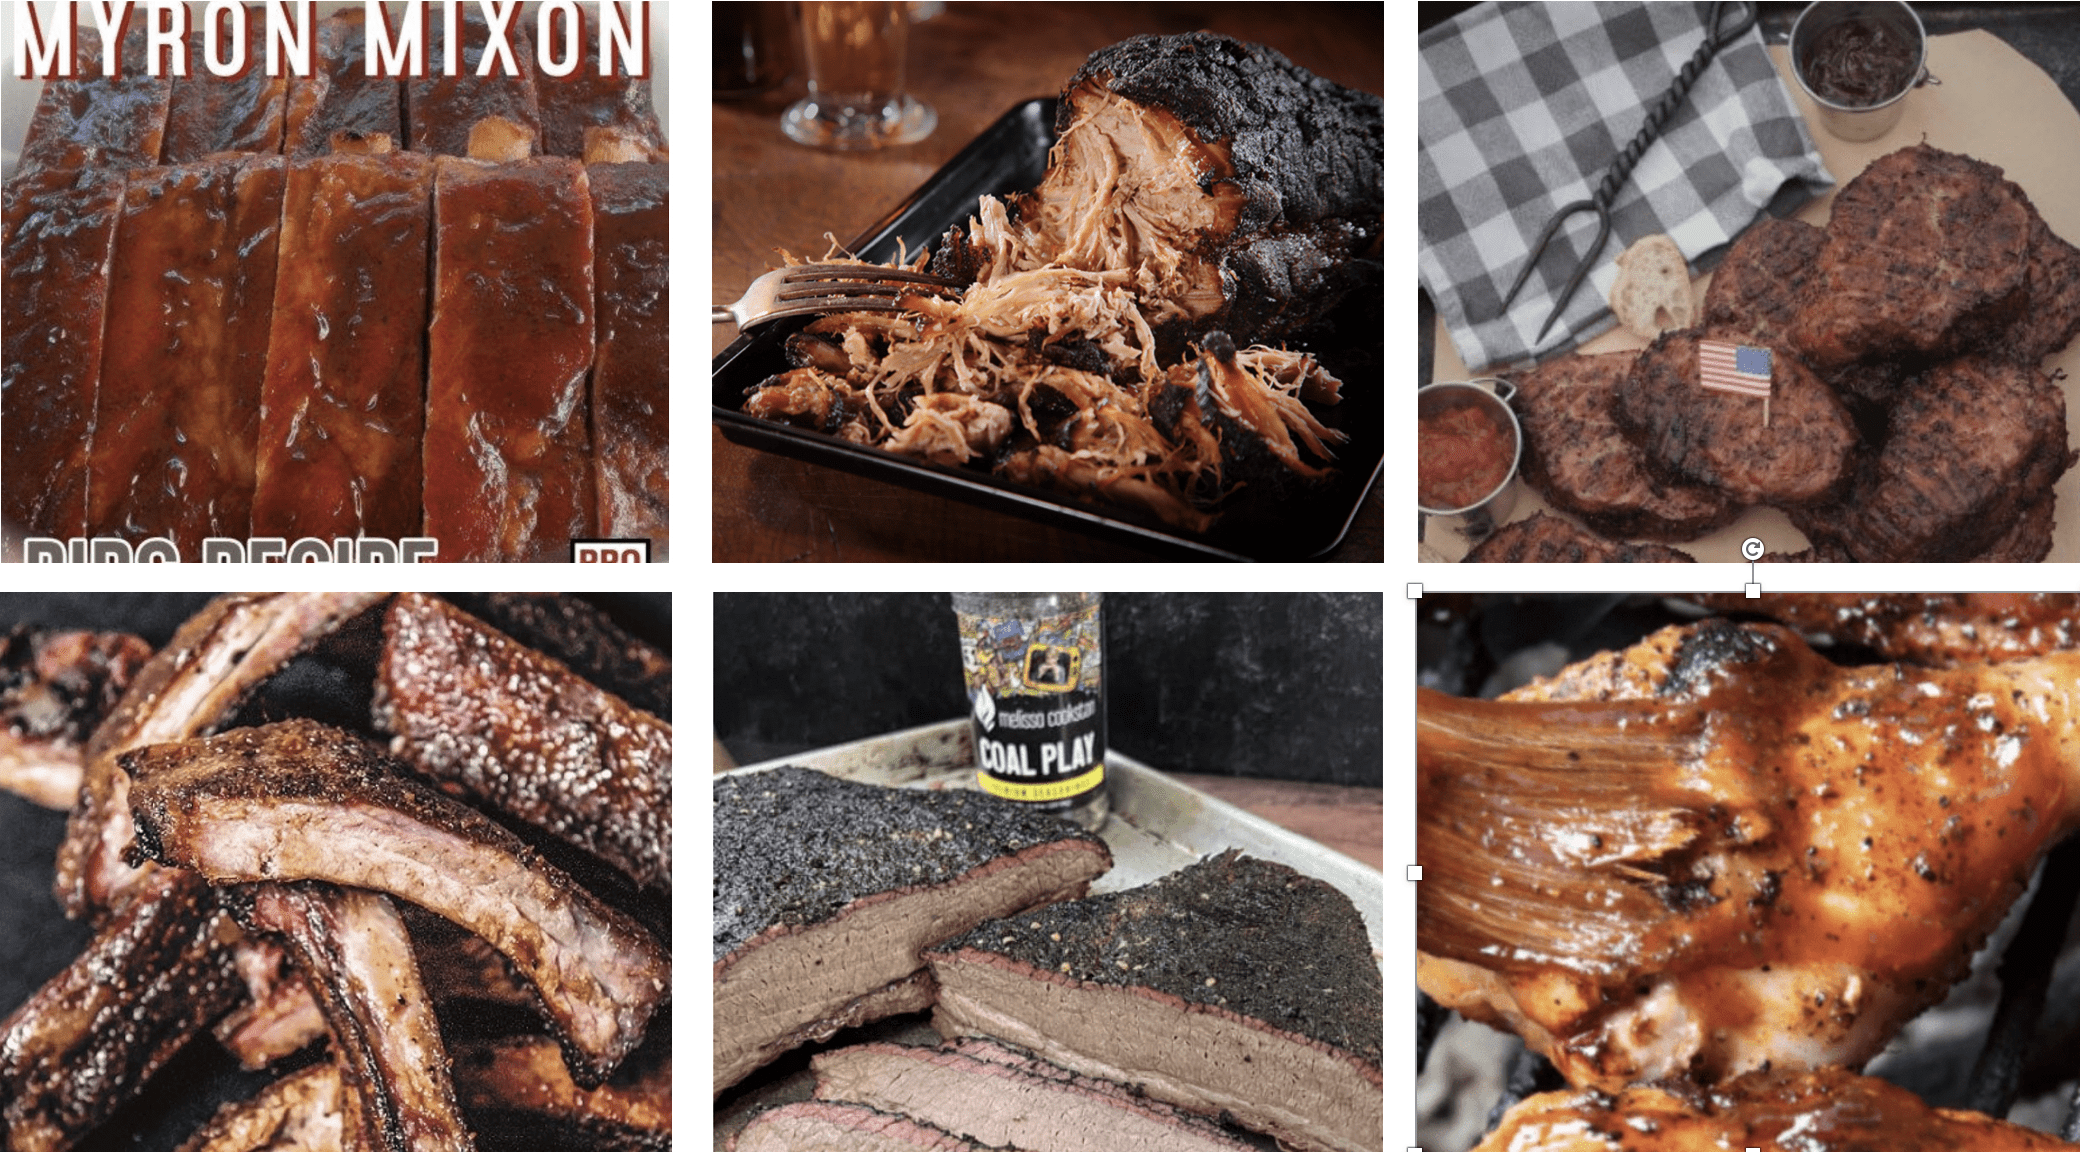
Myron Mixon’s Baby Back Rib Recipe
Myron cooks ribs in two different ways depending upon the type of competition.
Myron smokes baby back ribs for Memphis in May competitions and switches over to St Louis spares for Kansas City Barbecue Society events.
For both types of contests, Myron is simply cooking the type of ribs that the judges expect.
The main difference between how Myron cooks spare ribs and baby back ribs is the temperature of his pit.
Baby back ribs get smoked at 250F while St Louis spares get smoked at 275F.
The St Louis spares get smoked at a higher temperature as they have a higher fat content than baby back ribs.
The higher heat helps the fat render from the St Louis ribs.
Myron Mixon’s Baby Back Rib Recipe – Directions
Start by removing the membrane from the back of the ribs and trimming off any excess fat.
Combine the following marinade ingredients:
1 liter ginger ale
1 quart orange juice
1cup soy sauce
2 cups salt
2 1-ounce packets dry ranch dressing mix
Place the ribs in an aluminum pan and cover with the marinade. Wrap the pan in aluminum foil and refrigerate for four hours.
After four hours remove the ribs from the marinade and pat dry with paper towels.
After the ribs have been patted dry it is time to season them with the Myron Mixon’s Original rub – Jack’s Old South
Apply the rub to the top, back, and sides of the ribs.
Let the ribs stand at room temperature for 30 minutes as the rub works its way into the ribs.
As soon as the ribs have been coated with rub you need to make sure your smoker is at the right temperature; 250F for baby backs and 275F for spares.
Myron likes to use peach wood for ribs.
Myron does not place the ribs directly onto the grate of the smoker.
Myron places the ribs, bone side down, in an aluminum foil pan, and places the pan in the smoker.
Myron cooks EVERYTHING in pans.
I think this is a trick he uses to keep his smoker clean.
Myron lets the ribs smoke uncovered in the pan for 30 minutes.
After 30 minutes he starts spraying the ribs with the following:
Myron Mixon Rib Rub
1 cup (packed) light brown sugar
2 tablespoons chili powder
2 tablespoons dry mustard
2 tablespoons onion powder
2 tablespoons garlic powder
2 tablespoons cayenne pepper
2 tablespoons kosher salt
2 tablespoons coarsely ground black pepper
Myron Mixon Rib Spritz
3 cups apple juice
2 cups white wine vinegar
2 tablespoons liquid imitation butter
The ribs get spritzed at the 30-minute mark and every 15 minutes thereafter until the ribs have been smoked for two hours.
After the ribs have smoked for two hours remove the pan from the smoker.
Pour one cup of apple juice into the pan and cover the pan tightly with aluminum foil.
Place the foil-covered pan back on the smoker for one hour.
While the ribs are cooking in the foil you will have time to prepare the sauce for the ribs. This is what Myron calls his Hog Glaze.
Start by making a vinegar sauce. Combine the following ingredients and warm (but don’t boil) until the sugar and salt have dissolved.
Myron Mixon Basic Vinegar Sauce
2 cups cider vinegar
1 cup ketchup
1/2 cup hot sauce
2 tablespoons salt
2 tablespoons coarsely ground black pepper
1 tablespoon red pepper flakes
1/2 cup sugar
To finish making the Hog Glaze take two cups of the vinegar sauce and combine it with two 18 ounce jars of apple jelly and two cups of light corn syrup.
After the ribs have cooked in the foil for one hour remove them from the smoker and transfer them to a clean aluminum pan.
Brush both sides of the ribs with the Hog Glaze and cover the pan with aluminum foil.
Place the covered pan back on the smoker for 30 minutes while the sauce sets.
Myron says he shuts off the heat to the smoker in this last step.
He uses some big smokers so even when it shuts it down there will still be plenty of residual heat left over to cook the ribs some more.
After the sauce sets and the ribs are at the tenderness he wants Myron pulls them from the pit and sends them to the judges.
Marinade Ingredients
1 liter ginger ale
1 quart orange juice
1cup soy sauce
2 cups salt
2 1-ounce packets dry ranch dressing mix
How to Cook the Aaron Franklin Brisket Recipe at Home
Here’s how to BBQ brisket, as described by Aaron Franklin, widely regarded as one of the top brisket cooks and experts to ever fire up a smoker.
With a complete description of his process and videos to follow, you can perfectly recreate his epic brisket for yourself!
Aaron Franklin Brisket Recipe Ingredients
As mentioned, Franklin uses Prime briskets, which are very expensive and are certainly not affordable for everyone.
If you can’t find Prime, at the very least you should use ‘Choice’.
For seasoning, it’s easy to copy the traditional half-and-half kosher salt/16 mesh ground pepper rub.
Simply combine a couple of tablespoons of each into a shaker and put on the brisket.
You don’t want to go too heavy here, else you might over season.
Just focus on giving the brisket an even coat. But you can also choose any other brisket rub of your liking.
In Aaron’s brisket recipe, there is — in addition to adding a water pan to the cooker -mention of spritzing your brisket with a liquid to help keep the meat moist.
Any liquid can be used to make a spritz, but he recommends using apple juice and water.
Once you’ve lit your fire and added your meat, it’s time to sit back, grab a book, and make the most of your day.
The brisket is going to take the better part of the day to cook, so you can’t make plans to head out and run errands.
Depending on your cooker, you might want to cook your brisket fat side up or down, read that article to get the best advice. But the summary is: Most grills fat side down, offset smoker fat side up.
Every hour or so, you’re going to want to check your fire, make sure you don’t need to add another log or charcoal, and also take the opportunity to spritz your meat.
A general rule of thumb is to insert a food thermometer, and when the internal temp reaches 165 °F, it’s time to wrap it.
As discussed, Aaron uses butcher paper to wrap his brisket, and you can too, or you could wrap it in tinfoil if that’s all you have.
The purpose of the paper is to help the brisket braise in its own liquid and speed up the final steps of the cooking process, pushing the brisket through the stall and beyond, until the final desired internal temp.
Once your brisket has reached an internal temperature of approximately 200 °F – 205 °F, you’re going to want to check for tenderness.
If a digital thermometer probe can slide in and out like butter, you’re golden.
Best BBQ Recipes From Grilling Experts – Buy The Best Protein
The quality of your meat is relative to the success of your cook.
Higher grade meat with more marbling means the cut is going to be more tender and flavorsome, and the presence of more intramuscular fat makes it more forgiving during the cook.
Meaning, it’s going to be harder to dry out a Prime brisket than it is a Select.
Best BBQ Recipes From Grilling Experts – Use Fresh Herbs
Incorporate a basting brush made of herbs by attaching whole stems of thyme, rosemary, and sage onto a wooden spoon with butcher twine.
Use it to baste meats throughout the cook with butter, a good oil, or sauce.
Best BBQ Recipes From Grilling Experts – Low & Slow BBQ
The key to delicious BBQ is the precise mix of time and temperature.
Whereas grilling uses high and direct heat for quick cooks, traditional BBQing requires indirect, consistent low heat and longer cook times. It’s commonly referred to as a “slow ‘n’ low.”
Best BBQ Recipes From Grilling Experts – Add Flavor to Your BBQ Cook
After you’ve burnished your BBQ basics, try adding smoke woods like apple, hickory or cherry wood to your charcoal.
Sauces and rubs are also a great way to achieve a variety of flavor profiles.
Rubs are dry and usually applied to the meat before cooking.
Sauces are wet and are typically applied toward the end of the cook for a sweet or savory caramelized crust.
Best BBQ Recipes From Grilling Experts – BBQ Sauces & Rubs
Most people use a combination of BBQ rubs and sauces to spice up their meals.
Rubs are a mixture of dry ingredients and usually applied to the meat before cooking.
Sauces are wet and typically applied toward the very end of the cook for a sweet or savory caramelized crust. (Putting sauce on too early can cause the sauce to burn or dry out which will give you unpleasant results).
The sky’s the limit with BBQ rubs and sauces, as there are tons of options with which you can experiment to achieve a variety of flavors.
After you apply the rub, it’s best to let your meat sit covered at room temperature for a minimum of 15 minutes (many do it longer). It helps the flavors of the meat and the rub to blend together for the best results.
The great thing about dry rub is that it helps the meat to form a “bark,” a slightly crunchy crust that is delicious. It also gives your food a bold flavor, which cuts such as beef brisket can handle.
Best BBQ Recipes From Grilling Experts – Smoke Wood
Don’t forget smoke wood, which can bring out even more flavors.
Think of smoke as an ingredient for BBQ, just like sugar, cayenne, salt or pepper would for a recipe.
You want to use just enough so that it compliments your meat, but doesn’t overwhelm it.
Most charcoal should have very little flavor of its own.
Best BBQ Recipes From Grilling Experts -Smoke woods come from very specific types of trees and add a great aroma to your BBQ.
Smoke woods come in “chips”, smaller pieces (better for beginners) or large chunks.
Once you get the hang of charcoal, consider adding these chips or chunks of smoked woods such as mesquite, apple, hickory, or cherry to your charcoal.
Chips are best for short cooks (thin chicken, fish, and thin steaks or chops), while chunks provide the best choice for meats that take a longer time.
Apple
Sweet, fruity aroma and dense smoke.
Use with salmon, pork/ham, game, fowl, beef, fish and chicken.
Cherry
Subtle, sweet flavor.
Use with beef, fowl, game, pork, seafood, fish and chicken.
Hickory
Stronger aroma reminiscent off a bacon-like flavor.
Use with beef, pork, game, fowl. Popular with pork shoulder/butt and ribs.
Pecan
Subtly mild yet rich; sweet, spicy, nutty.
Pairs well with all meats and even cheese. Good with fish and chicken.
Mesquite
Bold and strong. A little goes a long way.
Use with beef, vegetables, and pork. A brisket favorite.
Beech
Mild and delicate. Similar to oak.
Use with fish, heavy game, and cheese. Good with fish.
Best BBQ Recipes From Grilling Experts – Injections
A fantastic way to get “Oh, my goodness” flavor into your meat is through injection.
While it seems odd to the beginner, it produces great results.
An injector – which looks like a really big doctor’s needle – is used to push flavored and/or tenderizing marinade deep into the meat.
This helps keep the meat moist, flavors it, and sometimes helps break down the meat’s collagens for tenderer BBQ.
Best BBQ Recipes From Grilling Experts – Brines
An increasingly popular (and very old) way of adding flavor to the meat is to brine it.
This simply means to soak your meat for a period of time in a solution of salt and water.
Brining your meat not only helps enhance the flavor but, especially with non-fatty cuts such as pork and chicken, can prevent them from drying out. In addition to helping retain moisture, brining also helps break down the meat’s collagens.
Best BBQ Recipes From Grilling Experts – Let Your Meat Rest
“If I’ve learned anything, it’s that resting your meat in a hot box after it comes out of the smoker makes for better barbecue.
Modify a cooler to suit your purpose at home and give yourself a few extra hours on the back end to rest the meat.
You won’t regret it
5 Masterchef Recipes For Home Cooks >>
Ultimate Outdoor TV Experience >>
How Italian Pizza Came To The US >>
The Best Outdoor Patio Heaters >>